
Professional Tape-In Hair Extension Expertise
Tape-In Hair Extensions: The Complete Professional Guide
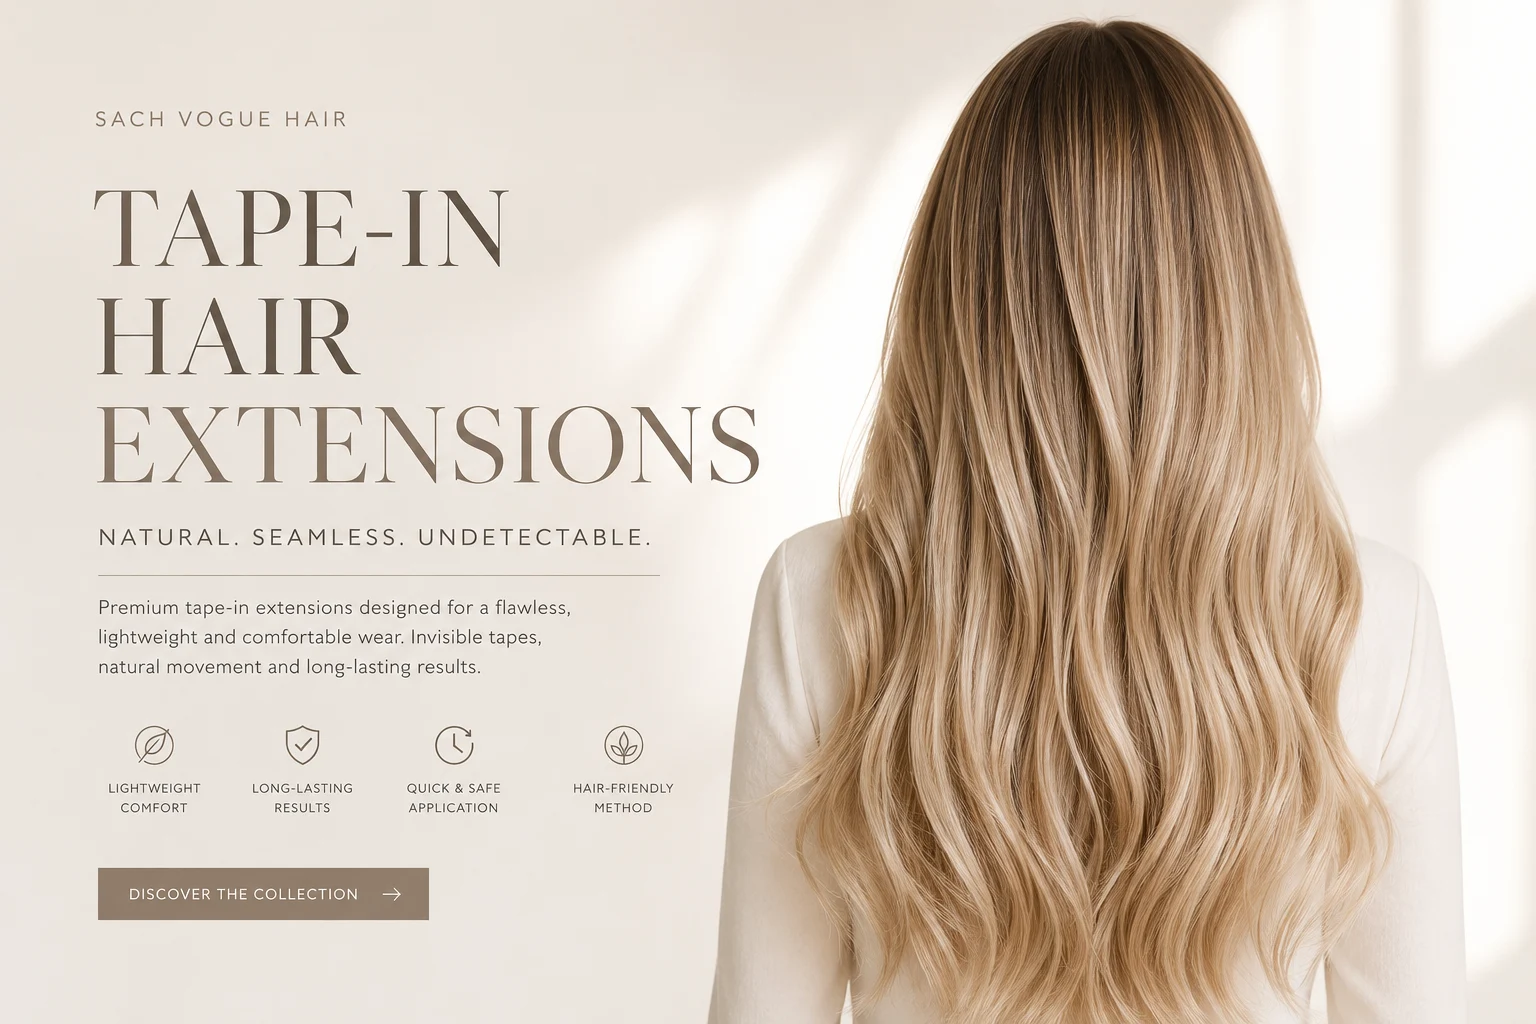
Tape-in hair extensions can be lightweight, discreet, reusable and exceptionally natural-looking—but only when the hair, adhesive, section size, tape width, placement and aftercare are planned as one complete system. This guide explains how professional tape-in hair extensions really work, why some applications remain secure while others slip after only a few washes, and how different tape widths can be used for volume, movement, fine-hair areas and colour placement without bleaching or colouring the client’s natural hair.
What Are Tape-In Hair Extensions?
Tape-in hair extensions are flat hair-extension panels fitted close to the scalp with professional adhesive tabs. A thin section of the client’s natural hair is placed between two matching tape panels, creating a flat “sandwich”. When applied correctly, the result sits close to the head, moves naturally and distributes weight across a wider surface than many strand-by-strand systems.
The method is popular because it can add length, density or carefully placed colour while remaining lightweight. It also allows the extension hair to be removed, cleaned, re-taped and reused when the hair remains in good condition and the maintenance process is performed professionally.
However, the apparent simplicity of the method is misleading. Tape-in application is not merely a matter of attaching one adhesive strip above another. The security of the installation depends on several variables working together:
- The natural hair must be completely clean and free from oil, silicone and product residue.
- The section placed between the tapes must be extremely thin and evenly distributed.
- The two adhesive surfaces must be able to make direct contact through and around the fine hair section.
- The panels must be aligned precisely, without folded corners or trapped loose strands.
- The chosen width must suit the application area and the movement required.
- The adhesive must be allowed to cure without washing, oil, steam or unnecessary manipulation.
This is why two clients can use apparently identical tape-in hair and still experience completely different results. Product quality matters, but the installation logic matters just as much.
The Unknown Truth: Adhesive Must Bond to Adhesive
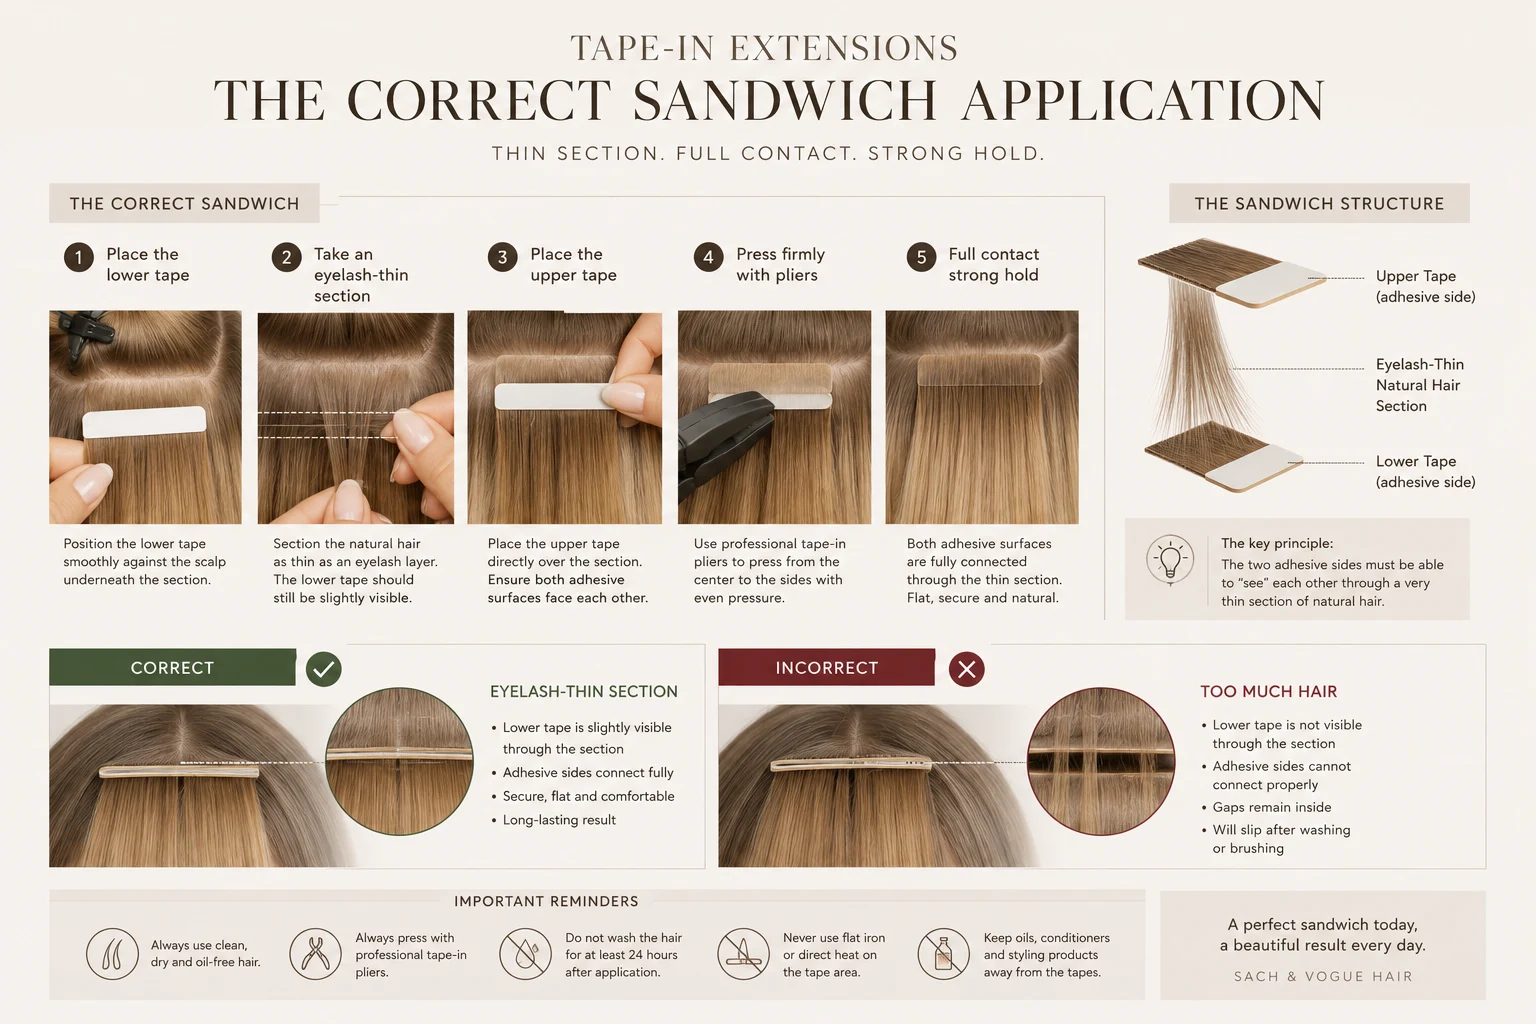
One of the most misunderstood facts about tape-in extensions is that the adhesive is not designed to hold a thick bundle of natural hair by itself. The secure bond is created when the adhesive surface of the upper panel connects with the adhesive surface of the lower panel around a very fine layer of natural hair.
If too much natural hair is placed between the two panels, the adhesive surfaces cannot properly “see” or contact one another. Instead of forming one unified bond, each tape sticks mainly to the hair trapped inside the sandwich. The installation may appear secure immediately after application, but water, shampoo, natural scalp oil and movement can gradually enter the spaces between the hairs. Once this happens, the panels can begin to slide apart.
A stronger adhesive does not correct a badly constructed sandwich. In fact, using excessively aggressive tape on an over-thick section can make removal more difficult without solving the underlying problem. Professional security comes from correct sectioning, alignment, pressure and curing—not from trying to compensate with unnecessary heat or stronger glue.
The hair section must be fine enough for the two adhesive tabs to bond to each other, not merely to the hair between them.
How Thin Should the Natural Hair Section Be?
The correct section should be exceptionally fine—closer to the fineness of eyelashes than to an ordinary salon section. It must contain enough natural hair to support the weight of the extension panel, but not so much that it blocks adhesive-to-adhesive contact.
A professional should be able to see a light, even distribution of hair across the panel. The section must not contain dense clumps, crossed hairs, short broken hairs or uneven areas where one side is thick and the other side is almost empty.
There are three reasons this matters:
- Bond strength: A fine section allows the two tape surfaces to connect properly.
- Weight balance: Even distribution prevents one area of the panel from carrying more tension than another.
- Comfort: Neat sectioning reduces pulling, twisting and pressure on isolated natural hairs.
Taking too little hair can also be incorrect. If only a few individual hairs carry the full panel, the section may feel uncomfortable and place unnecessary tension on the natural hair. The goal is not “as little hair as possible”; it is the correct, even and extremely fine section for the selected tape width and hair density.
Preparing Natural Hair Before Tape-In Application
Correct preparation begins before the first panel is applied. Natural hair must be neutral, clean and completely free from anything that can create a barrier between the hair and the adhesive.
Before installation, avoid:
- Conditioner close to the scalp
- Hair masks
- Leave-in conditioner
- Hair oils and serums
- Silicone-rich styling products
- Dry shampoo residue
- Root sprays, waxes or colour powders
The hair should be washed with an appropriate cleansing shampoo and rinsed thoroughly. Conditioner, when necessary for the lengths, must not be applied to the intended tape area. The hair must then be dried completely. Tape should never be applied to damp hair.
This preparation is especially important for clients with naturally oily scalps. Oil can migrate into the attachment zone quickly, so installation on hair that is already coated with scalp oil, conditioner or styling residue significantly increases the risk of premature slippage.
Hair that has just received an intensive conditioning, smoothing or oil-based salon treatment may need to be cleansed again before tape installation. The extension artist should assess the hair rather than assuming that “freshly washed” always means “ready for tape”.
How Tape-In Hair Extensions Should Be Applied Professionally
A professional application begins with an overall plan. The stylist must consider the client’s natural density, parting, crown movement, temple visibility, haircut, target length, target gram amount and colour distribution before placing the first row.
1. Plan the placement
Tape panels should not be installed randomly. The artist must preserve enough natural hair around the perimeter and parting to conceal the extensions during everyday movement. High ponytails, side partings and the natural fall of the hair should be considered.
2. Create clean sections
Each section should be straight, controlled and free from loose hairs crossing into neighbouring panels. The parting must correspond to the selected tape width. A 12 cm panel requires a very different placement strategy from a 2 cm contour panel.
3. Position the lower panel
The lower tape is placed beneath the carefully selected natural-hair section. It should sit close enough to the scalp to remain discreet, but not so close that it restricts movement or creates tension. The natural hair must be able to move and fall comfortably.
4. Align the upper panel precisely
The upper panel must match the lower panel edge to edge. Misaligned corners allow water, shampoo and oil to enter. The panels should not be offset, folded or applied over loose surrounding hairs.
5. Press with professional tape-in pliers
Once aligned, the sandwich is compressed evenly with suitable tape-in hair-extension pliers. Pressure should be firm and controlled across the full width. The purpose is to create consistent adhesive contact—not to crush the panel or heat the adhesive.
6. Check every sandwich
The artist should inspect each panel for lifted corners, uneven hair distribution, trapped hairs and misalignment. A panel that is not correct should be removed and rebuilt immediately rather than left as a future failure point.
Tape-In Sectioning and the Bricklaying Placement Technique
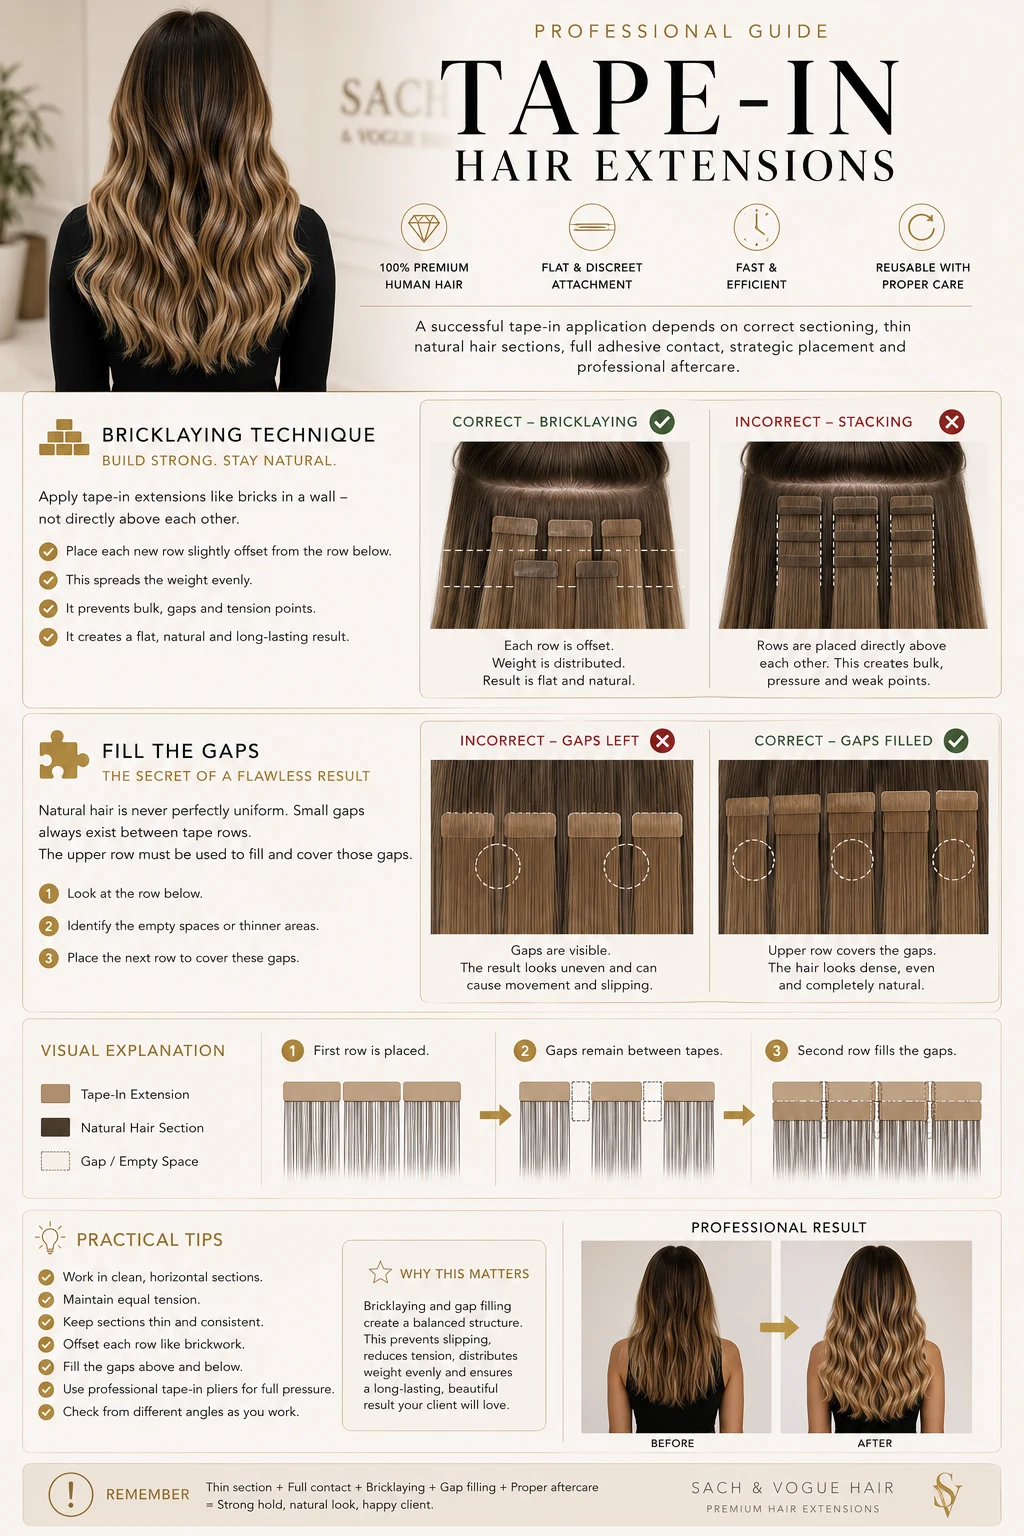
A professional tape-in installation should be planned like brickwork rather than built in rigid vertical columns. Each new row is offset from the row beneath it so that the upper tape panels sit over the spaces between the lower panels. This staggered structure is commonly described as the bricklaying technique.
The purpose is not decorative. When several tape panels are positioned directly above one another, the attachments can form visible vertical lines, concentrate weight in the same areas and leave channels with insufficient extension hair. Offset placement distributes the hair more evenly across the head and creates a flatter, more natural transition.
How the upper row should fill the lower-row gaps
After completing one row, the stylist should identify the spaces between neighbouring tape sandwiches. The centre of each panel in the next row should be positioned approximately over one of those spaces. The extension hair falling from the upper panel then covers the gap below, while the panels on the lower row support the areas on either side.
- Do not stack every tape directly above the tape below it.
- Offset each row in the same way that bricks are staggered in a wall.
- Use the upper row to cover the visible spaces between panels in the lower row.
- Maintain clean horizontal sections and consistent distance from the scalp.
- Adapt panel width and spacing to the client’s density, head shape and haircut.
- Check the distribution from several angles before continuing to the next row.
The centre of the upper tape should help cover the space between the two tapes below it. This produces continuous density instead of separate vertical columns.
Bricklaying does not mean that every head must follow one identical diagram. The crown, sides, temples, nape, natural parting and mobile areas require individual planning. The principle is to stagger the rows and fill the gaps while preserving comfort, concealment and balanced weight distribution.
Never Use a Flat Iron or Direct Heat to Seal Tape-In Extensions
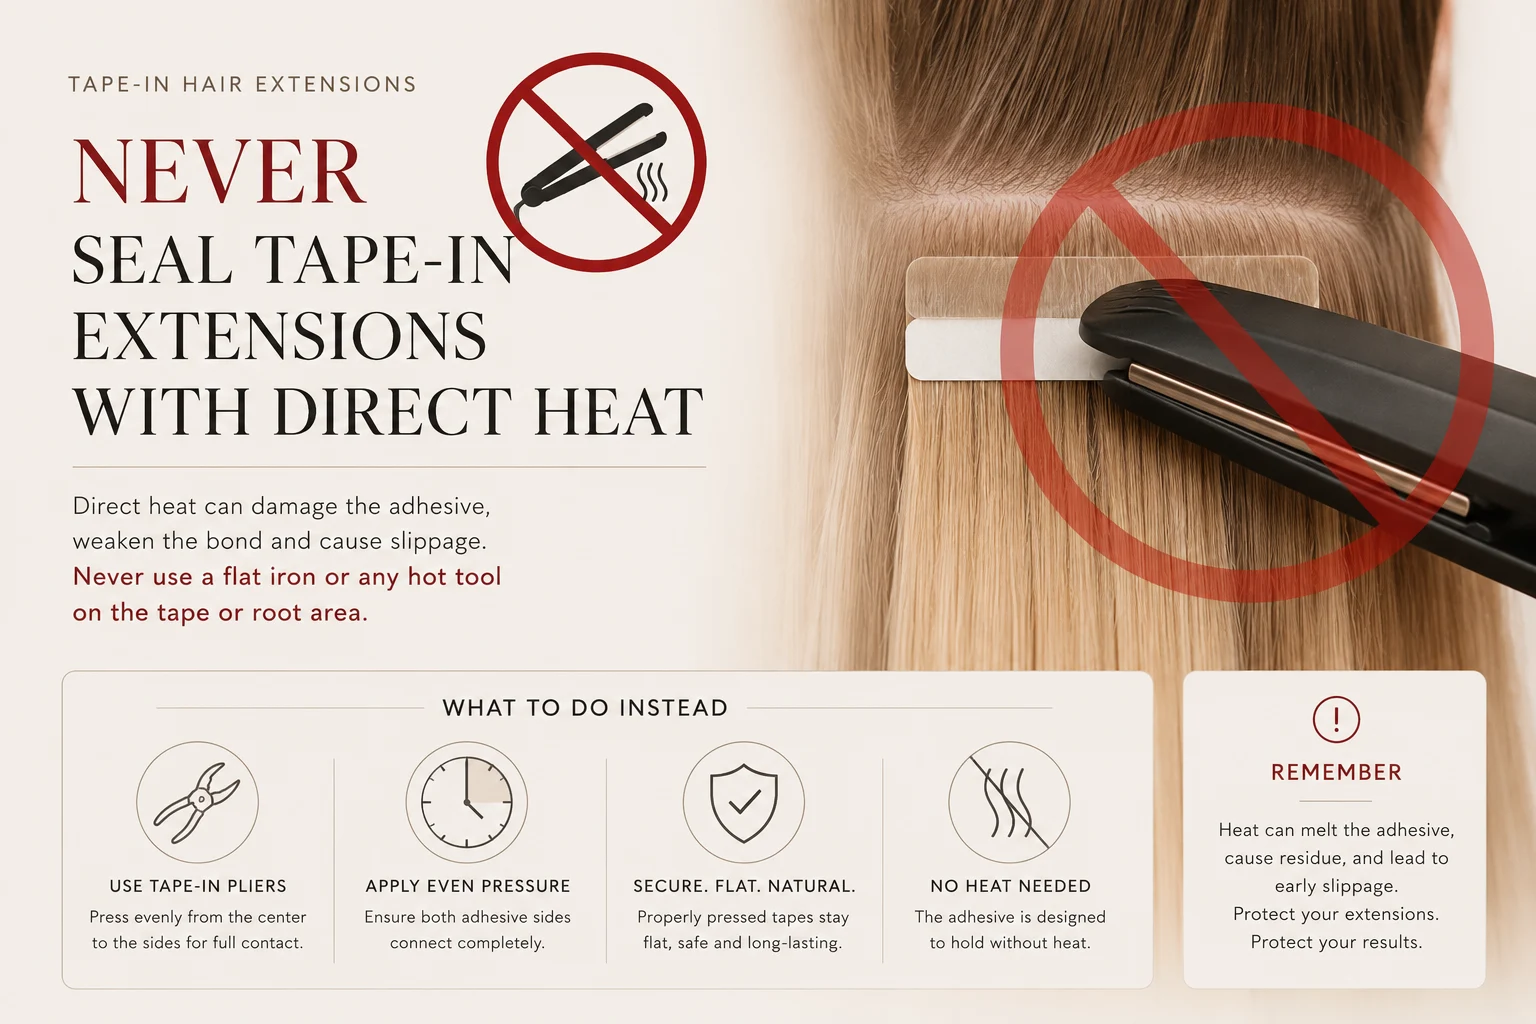
Applying a flat iron, hot tool or uncontrolled heat directly over tape-in adhesive is not part of correct application. Heat can alter the adhesive, force it beyond the edge of the panel, make future removal more difficult and create inconsistent curing.
Tape-in panels are designed to bond through correct surface contact and controlled pressure. Professional tape-in pliers are used to compress the sandwich evenly. They do not need a flat iron to “melt” the tabs together.
Heat styling can still be used on the extension lengths after installation, provided the hot tool is kept away from the adhesive tabs. Direct heat on the attachment area should be avoided throughout wear.
The First 24 Hours: Allow the Adhesive to Cure
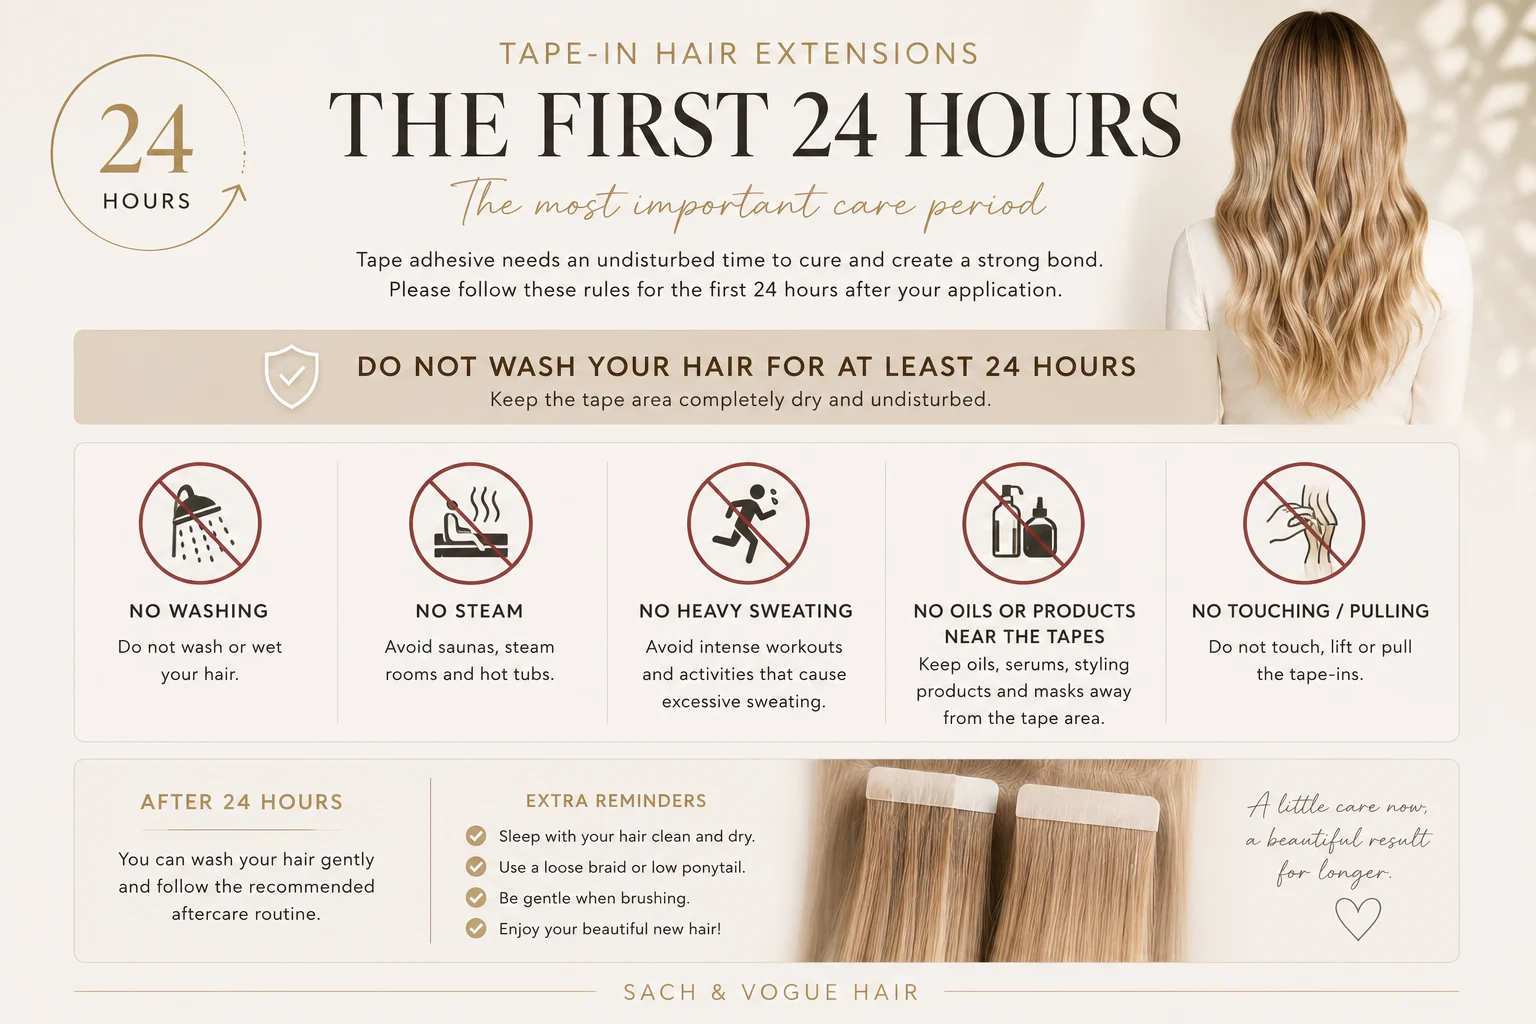
The first 24 hours after application are critical. During this period, the adhesive surfaces settle and develop their working bond. Washing, sweating heavily, steam, sauna, swimming, oil, conditioner or unnecessary manipulation can interfere with this process.
- Do not wash the hair.
- Do not apply oil, serum or conditioner near the roots.
- Do not use a flat iron on the tapes.
- Avoid sauna, steam rooms and intense exercise that saturates the scalp.
- Do not repeatedly lift, press or inspect the panels with oily fingers.
After the curing period, the hair can be washed using a gentle technique. The client should never try to test the installation by pulling the panels immediately after application.
Why Tape-In Hair Extensions Slip or Fall Out
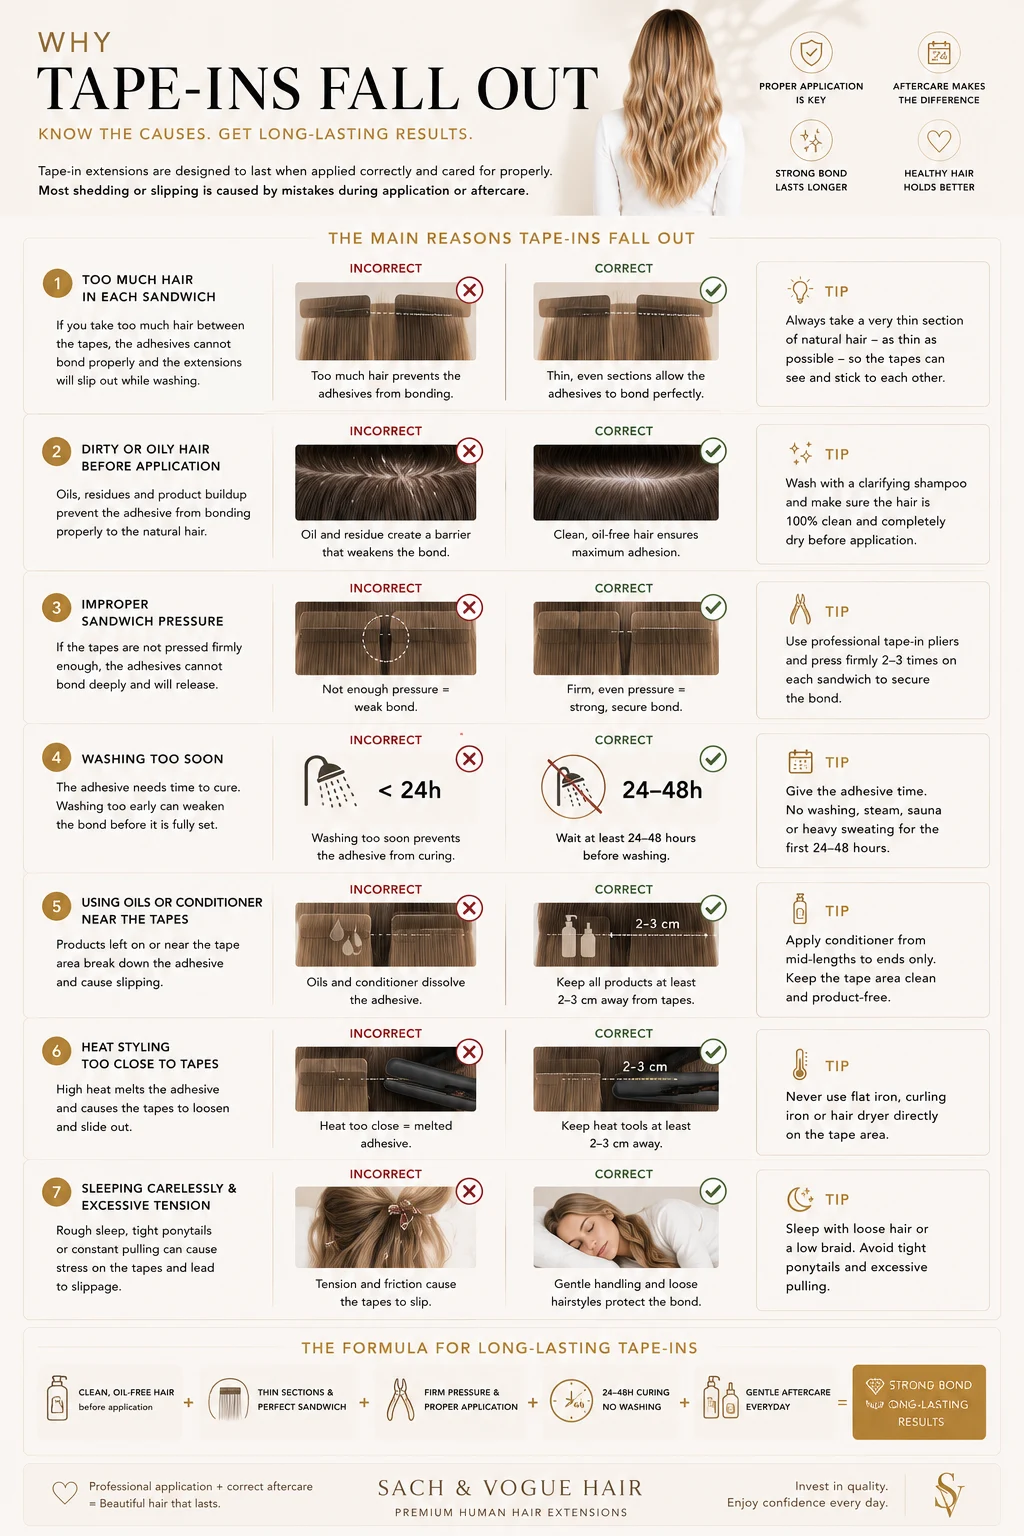
When several panels fall after only one or two washes, the problem usually has a specific cause. It should not automatically be blamed on the client, the shampoo or the adhesive before the application itself is examined.
Too much natural hair between the panels
This is one of the most common causes. A dense section prevents adhesive-to-adhesive contact. Water and product enter the hair-filled space, causing gradual separation.
Hair was not properly cleansed
Oil, silicone, conditioner and styling residue create a barrier that weakens the bond from the beginning.
The hair was damp
Moisture trapped during application compromises adhesion and can encourage early lifting.
The panels were misaligned
Exposed edges and unmatched corners allow shampoo, water and oil to enter the sandwich.
Insufficient or uneven pressure
Pressing only the centre leaves corners vulnerable. The full panel must receive even pressure.
Washing before curing
Washing during the first 24 hours can interrupt the bond before it is fully established.
Conditioner or oil applied at the roots
Conditioning products should remain on the mid-lengths and ends. Repeated product contact with the tabs can soften the adhesive.
Direct heat on the tape
Flat irons and very hot dryer nozzles can change the adhesive and damage the attachment.
Incorrect removal and re-taping
Old adhesive residue must be removed properly before replacement tape is applied. New tape placed over dirty, oily or uneven residue will not perform correctly.
Excessive weight or unsuitable placement
Large panels placed in fragile, sparse or highly mobile areas can create tension. Smaller widths are often more suitable for temples, sides, crown detailing and fine-hair zones.
For a focused troubleshooting guide, see Why Tape-In Hair Extensions Fall Out.
How Tape Width Changes Movement, Coverage and Placement
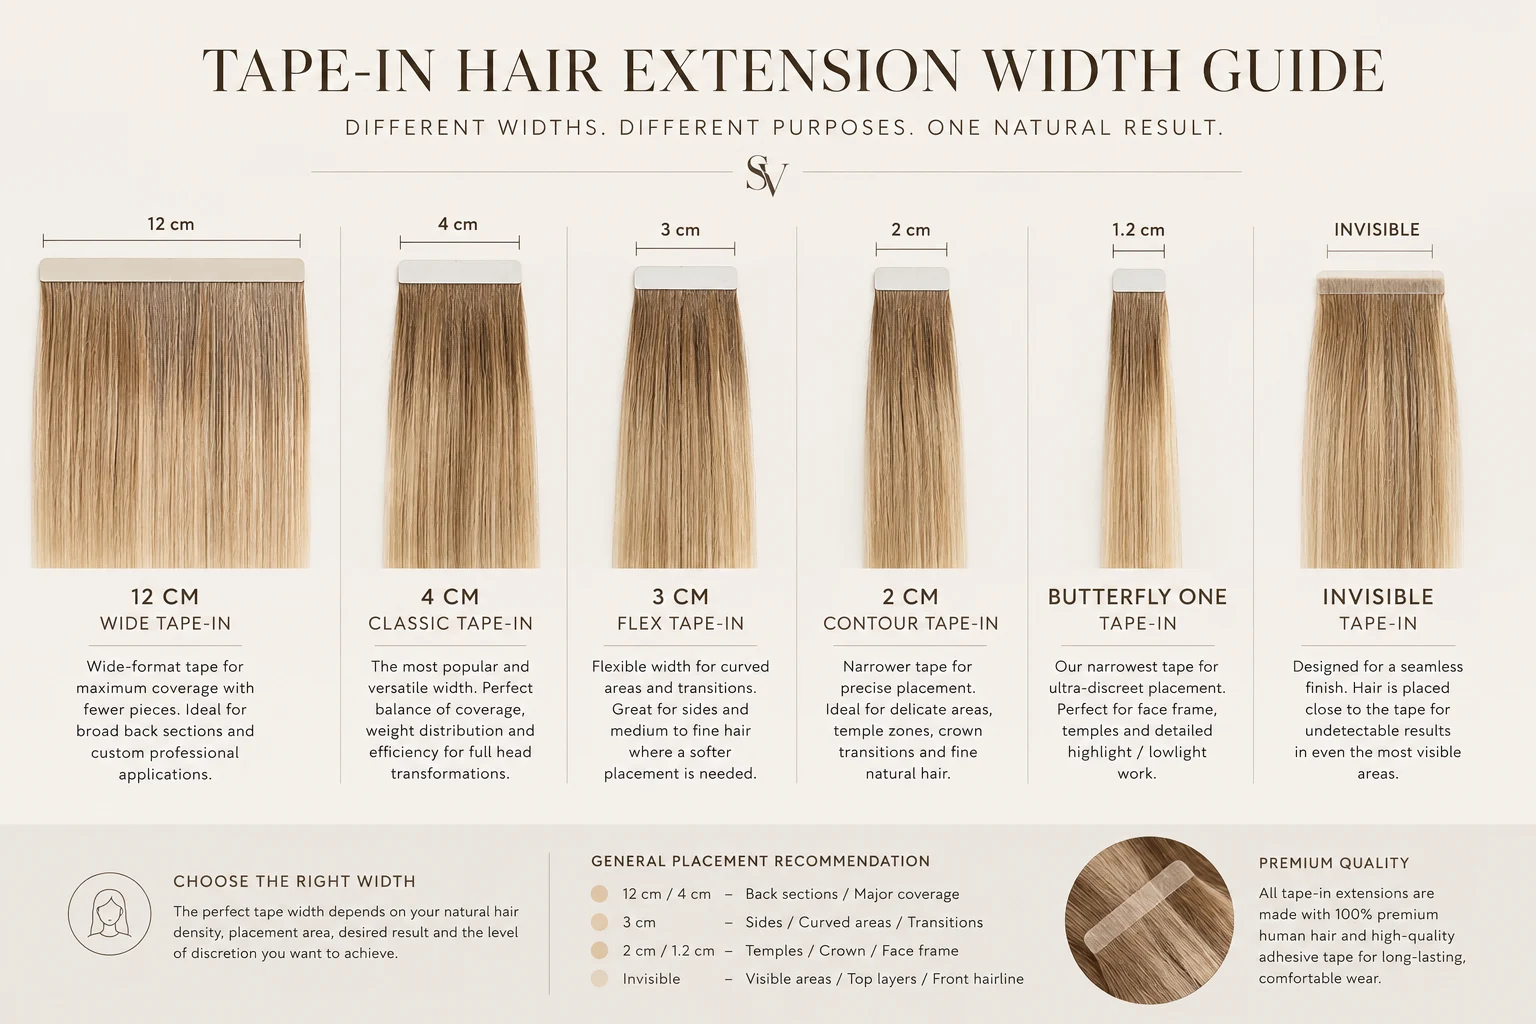
Tape-in hair should not be treated as one universal 4 cm product. Different widths allow the extension artist to adapt coverage, movement and colour placement to the anatomy of the client’s head.
| Format | Professional name | Best suited to | Movement |
|---|---|---|---|
| 12 cm | Volume Tape™ 12 | Broad rear sections, fast coverage and strong volume building | Controlled |
| 4 cm | Classic Tape™ 4 | Standard full-head application and balanced everyday use | Natural |
| 3 cm | Flex Tape™ 3 | Layered hair, curved areas and greater placement flexibility | Enhanced |
| 2 cm | Contour Tape™ 2 | Temples, sides, crown detailing, face framing and fine-hair zones | High |
| 1 cm folded | Butterfly One™ | Precision colour placement and discreet, highly mobile detail work | Maximum |
12 cm Volume Tape™
The 12 cm format provides broad coverage and can reduce the number of individual panels needed in suitable rear sections. It is especially useful when speed, density and a clean volume line are priorities. Because of its width, it is not intended for every area; careful head-shape and movement planning are required.
4 cm Classic Tape™
The 4 cm panel is the professional standard for many full-head applications. It offers a practical balance of coverage, flexibility and straightforward maintenance.
3 cm Flex Tape™
A 3 cm panel offers more flexibility than the classic 4 cm format. It can follow layered haircuts and curved areas more naturally and allows the stylist to refine transitions without moving immediately to a very small panel.
2 cm Contour Tape™
The 2 cm format is designed for precision. It is useful around the sides, temple region, crown details and other areas where a standard panel may feel too wide or visible. It also gives the colourist greater control over highlights, lowlights and face-framing pieces.
Butterfly One™
Butterfly Tape is designed to fold into a compact approximately 1 cm placement. This allows exceptionally detailed work in small, mobile areas and makes it possible to introduce fine colour accents between the client’s natural hair without using a broad standard panel.
Invisible Tape-In Hair Extensions
Invisible Tape-In Hair Extensions are being prepared as a future addition to the Sach & Vogue Hair professional tape family. Production is planned to begin after final equipment installation, material trials and quality-control approval. Until those stages are complete, the product should be considered in development rather than available for immediate order.
Learn about Invisible Tape-In Hair Extensions
For a detailed comparison, read our Tape-In Hair Extension Width Guide.
Tape-In Colour Placement: Highlights, Balayage and Ombré Without Bleaching Natural Hair
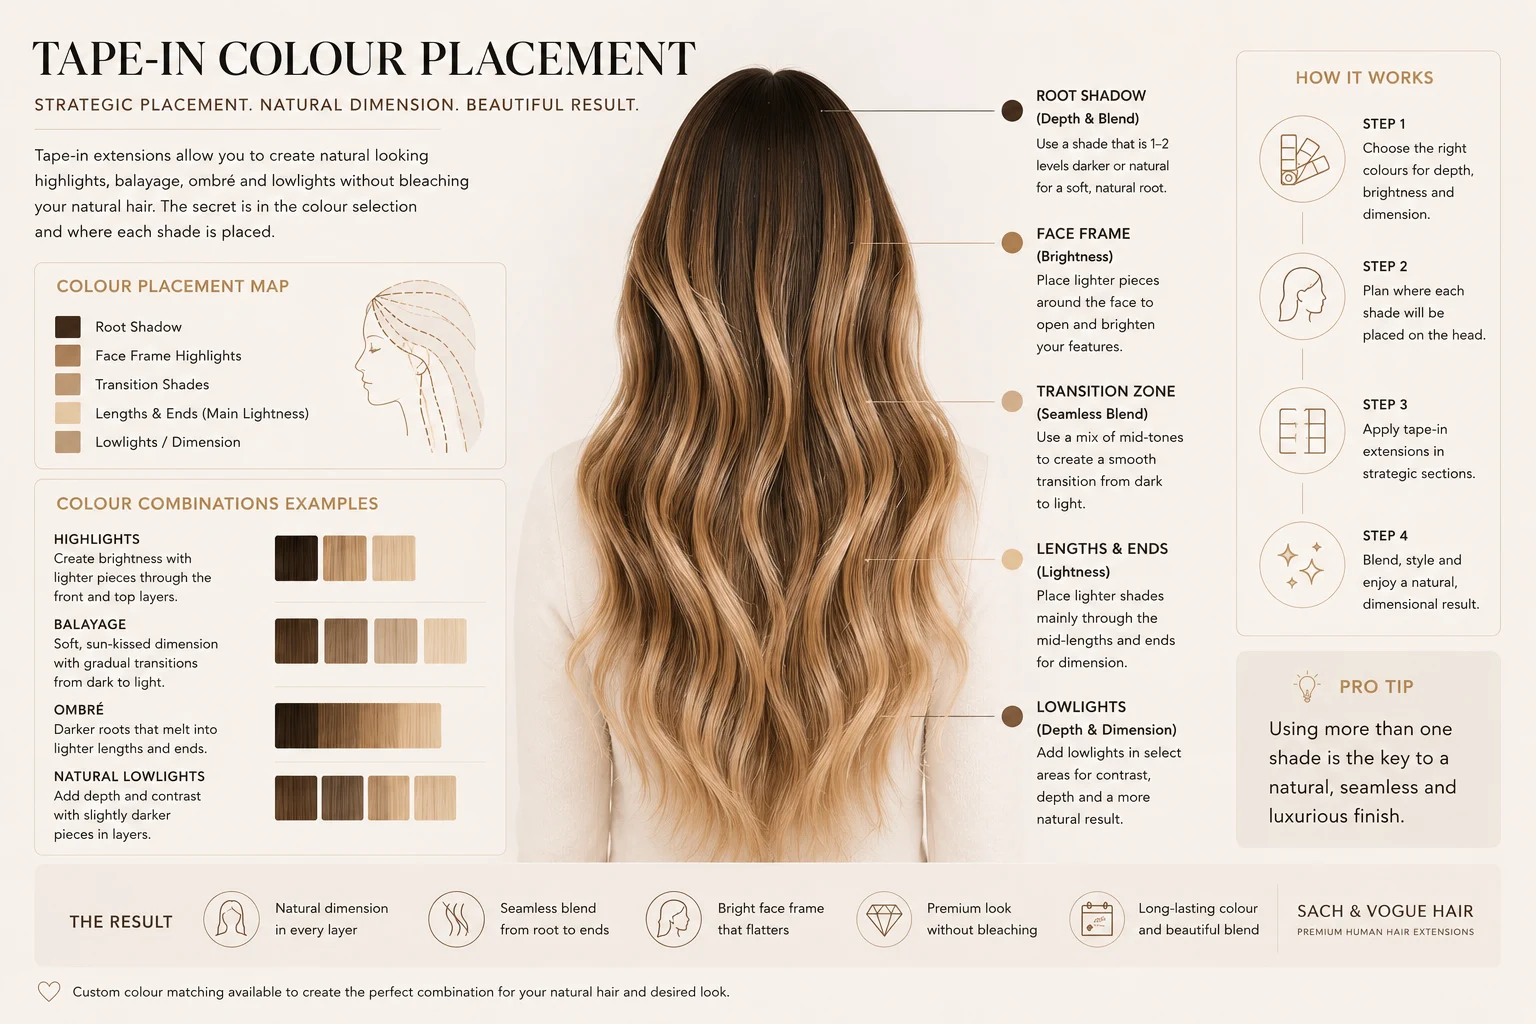
Narrow tape-in formats are not only tools for adding length. They can also be used as a removable colour-placement system. By selecting the correct colours and placing 3 cm, 2 cm or Butterfly panels strategically, a stylist can introduce contrast, lightness and dimension without bleaching or permanently colouring the client’s natural hair.
- Face-framing highlights
- Money-piece brightness
- Fine highlights through the sides and crown
- Balayage-inspired lightness through selected lengths
- Ombré transitions
- Lowlights and brunette dimension
- Ash, beige, copper or fashion-colour accents
- Peekaboo colour beneath the natural top layer
This approach leaves the client’s natural colour chemically untouched. It does not mean the application is maintenance-free or risk-free: the panels must still be fitted, cared for and removed professionally. The advantage is that the colour effect comes from extension placement rather than bleach or oxidative dye on the natural hair.
Sach & Vogue Hair offers 141 standard shades and bespoke colour blending for clients whose roots, highlights, balayage or undertones cannot be represented by one catalogue code. Narrow tape formats allow those custom colours to be placed with much greater precision.
Read the complete guide: Tape-In Colour Placement. For bespoke shade planning, visit Custom Colour Matching for Hair Extensions.
How Many Grams of Tape-In Hair Extensions Do You Need?
The correct gram amount depends on the client’s natural density, haircut, current length, target length and desired finish. The same number of panels can produce very different results when the hair length or density changes.
- 50 g: partial volume, colour accents or small density correction
- 100 g: light volume for suitable fine or medium hair
- 150 g: fuller natural volume and moderate length transformation
- 200 g: stronger density and longer transformations
- 250 g or more: very dense natural hair, short blunt cuts or long high-density goals
These figures are not universal prescriptions. A client with very sparse 65 cm hair may need a different plan from a client with a short, dense haircut at the same target length. Gram planning should always be based on the individual.
How to Wash and Care for Tape-In Hair Extensions
After the first 24 hours, tape-in hair can be washed gently. The goal is to clean the scalp without aggressively rubbing, twisting or pulling the attachment points.
- Wash in an upright position rather than piling the hair on top of the head.
- Use the fingertips gently between rows; do not scratch the tapes with nails.
- Rinse thoroughly so shampoo does not remain around the tabs.
- Apply conditioner and masks only to the mid-lengths and ends.
- Keep oils and serums away from the tape area.
- Pat excess water gently; do not twist or wring the hair.
- Dry the roots and attachment area thoroughly.
- Brush with a suitable extension brush while supporting the roots.
- Do not place a flat iron directly over the tapes.
Sleeping with wet tape-in extensions can encourage tangling and place unnecessary stress on the attachments. Before sleeping, the hair should be dry and secured in a loose braid or low ponytail with a soft hair tie.
Professional Removal, Cleaning and Reapplication
Tape-in extensions should be removed using an appropriate professional remover. The panels must never be pulled apart while still firmly attached to the natural hair.
- Adhesive residue is cleaned carefully from the extension panel.
- The natural hair is detangled without forcing residue through the lengths.
- The extension hair is inspected for condition, density and shedding.
- The attachment surface is cleaned, dried and prepared for replacement tape.
- Fresh replacement tabs are fitted evenly.
- The client’s natural hair and placement plan are reassessed before reinstallation.
Reapplication is not simply a repeat of the first appointment. Hair growth, density changes, haircut changes and the condition of both the natural hair and extension hair must be reviewed each time.
Professional Tape-In Application Checklist
- Natural hair cleansed and completely dry
- No oil, serum, conditioner or silicone residue at the roots
- Placement planned before installation
- Correct width selected for each zone
- Natural-hair section extremely fine and evenly distributed
- Adhesive surfaces aligned edge to edge
- No loose or crossed hairs trapped inside
- Full panel pressed evenly with professional tape pliers
- No flat iron or direct heat used on adhesive tabs
- Client instructed not to wash for the first 24 hours
- Conditioner and oil kept away from roots
- Maintenance and removal appointments explained clearly
Frequently Asked Questions
Are tape-in hair extensions comfortable?
Yes, when the width, weight, sectioning and placement are appropriate. Panels applied too close to the scalp or in unsuitable areas can feel restrictive.
How long can tape-in extensions stay in the hair?
Maintenance timing depends on natural hair growth, scalp oil, care and placement. They should be professionally removed and repositioned once they have grown down sufficiently; they should not be left indefinitely.
Can tape-in hair extensions be reused?
Yes. Premium human-hair tape extensions can be cleaned, re-taped and reused when they are removed carefully and remain in good condition.
Why did my tape-in extensions fall after two washes?
Common causes include taking too much natural hair between the tapes, applying to oily or product-coated hair, washing before curing, misaligned panels or conditioner contacting the adhesive.
Should heat be used to seal tape-in extensions?
No. Correct tape-in application uses precise alignment and controlled pressure with professional tape pliers. A flat iron should not be used on the adhesive.
How long should I wait before washing?
Wait at least 24 hours after application so the adhesive can cure without water, oil or unnecessary manipulation.
Can I apply conditioner to tape-in extensions?
Conditioner can be used on the mid-lengths and ends, but it should not be applied directly to the tapes or roots.
Can tape-in extensions be used for highlights without bleach?
Yes. Narrow tape panels can introduce highlights, lowlights, balayage-inspired effects and fashion colours without bleaching the natural hair.
What is the difference between 4 cm and 2 cm tape-in hair?
A 4 cm panel provides broader standard coverage. A 2 cm panel offers more movement and precision for temples, sides, crown detailing, fine hair and colour placement.
What is Butterfly Tape-In Hair?
Butterfly Tape is a compact format designed to fold into an approximately 1 cm placement, allowing detailed and highly flexible work.
Are Invisible Tape-In Hair Extensions available now?
Sach & Vogue Hair’s Invisible Tape-In Hair Extensions are currently in development. Production is planned after equipment installation, material trials and quality-control approval.
Can tape-in extensions damage natural hair?
Correctly selected, fitted, maintained and removed tape-in extensions should not unnecessarily damage the natural hair. Poor sectioning, excessive weight, neglect or forceful removal can cause problems.
Can tape-in extensions be used on fine hair?
They can be suitable for some fine-hair clients, but panel width, weight and visibility must be assessed carefully. Smaller formats may be more suitable in delicate areas.
Can I order custom colours?
Yes. Sach & Vogue Hair offers 141 standard shades and bespoke blends based on roots, mid-lengths, ends, highlights and undertones.
Do you supply professional salons?
Yes. Salon owners, extension artists and professional buyers can request professional access and product guidance.
Why should tape-in rows be applied like brickwork?
Staggering each row prevents rigid vertical stacking, distributes the extension hair more evenly and allows the panels in the upper row to cover the spaces between the panels below. The result is flatter, fuller and more natural.
Should the upper tape sit directly above the lower tape?
Not as a repeated vertical column. In most zones, the next row should be offset so the centre of the upper panel helps fill the gap between two panels below. Placement must still be adapted to the client’s head shape, density and visible areas.
Before and After: Planning the Complete Transformation
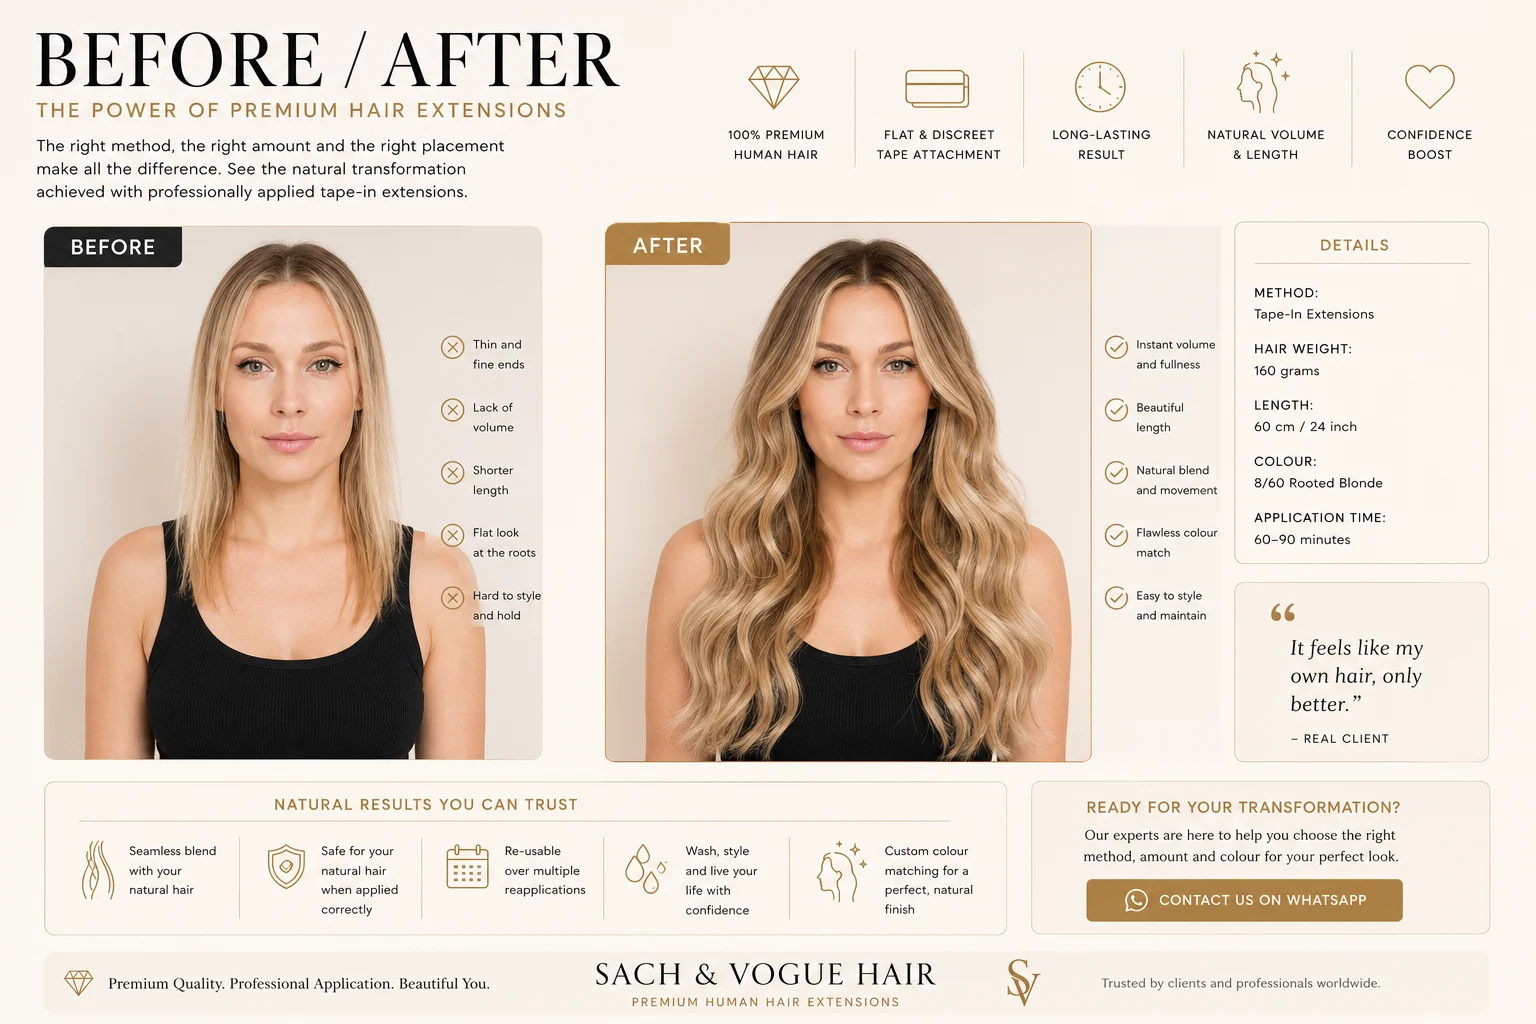
A credible tape-in transformation is not created by length alone. The final result depends on the client’s starting density, haircut, target length, gram amount, colour formula, tape width and placement pattern. A professional before-and-after record should therefore state the method, length, approximate weight and colour combination used.
For short, fine or blunt natural hair, sufficient gram weight and carefully staggered placement are essential. Too little hair can produce thin ends or a visible separation between the natural haircut and the extensions. Correct planning creates continuous density from the roots through the ends.
Professional Planning Before Ordering
Plan the Correct Tape Width, Colour and Gram Amount
Send clear daylight photos of your natural hair, your target length and the result you want. Sach & Vogue Hair can help you plan the most suitable tape widths, colour direction and gram amount for a balanced professional result.